本文是关于自己写文档(不局限于接口文档)时的一些记录,一条流程,即:文档源码托管在github->文档编写用vscode编辑器->采用sphinx+rst标记语言->发布到rtd。
目录
下面是每部分的概述。
1. GitHub
代码托管平台,龙头般的存在,此用于托管文档源码,官网是:https://github.com
1.1 新建仓库
选择.gitignore并通过README.md初始化。
1.2 检出或克隆仓库
可以使用svn检出或git克隆仓库到本地,看个人喜好,墙裂推荐git!
2. VSCode
Visual Studio Code,微软力作,真心好用,用过的人都知道,官网是:https://code.visualstudio.com
主要记录下我常用的插件和配置:
2.1 Chinese (Simplified) Language Pack for Visual Studio Code
额,不用说,简体中文语言包
2.2 Python
支持很多中编程语言,按需安装,Python的话顺道也安装Anaconda插件吧。
2.3 Shell Launcher
用以配置启动多种终端的,比如powershell、cmd、wsl bash、git bash等。
多说一句,当时终端这个问题折腾太久了,我需要python、git等命令,可是又想用wsl里的,最后也没一个完美的办法,只得安装了Git for Windows,它带了一个git-bash使得可以支持windows的程序,又能作为默认终端虽比不上wsl可也比cmd强太多。后来用这个插件,配合快捷键开启多种类型终端。
2.4 Windows opacity
vscode透明度的插件
2.5 backgound-cover
vscode背景图插件,可配合2.4中透明度插件食用。
2.6 Bracket Pair Colorizer
小括号、大括号、中括号等等颜色高亮、对称显示
2.7 Indent-Rainbow
缩进浅颜色显示。
2.8 REST Client
可以在vscode中发起API请求的插件。
2.9 reStructuredText
支持rst标记语言的插件。
2.10 Settings Sync
很实在的插件,把vscode的配置、插件等信息上传到github gist,或读取信息更新vscode,可以说实现了一处上传、多处同步的效果,避免了重复性配置vscode!
2.12 remote ssl
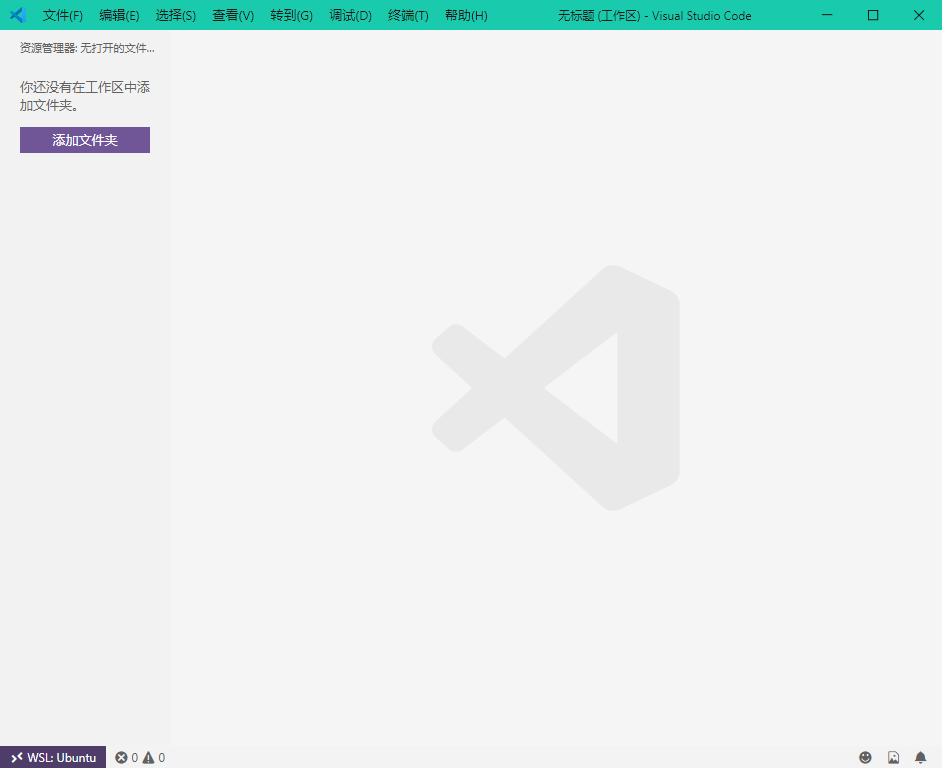
这个扩展插件能让vscode在wsl中运行。
- 打开windows上的vscode,安装remote ssl扩展
- 在windows上输入wsl命令调起wsl终端,在wsl环境里随便找个目录输入 code . 命令(注意有个点,而这个code命令就是vscode安装目录/bin/code,如果安装vscode时将命令添加到PATH中,这个命令可以直接使用,否则请使用绝对路径。)
- 上述命令第一次使用会很快安装好所需组件,并在vscode通知区有提示信息,完成后,在底部栏左下角会有wsl的提示字样(可能要重启下vscode)
- 以后打开vscode就会自动连接到wsl中,你的扩展需要重新安装下(算是可以从原有扩展中一键安装)
- 更多参考官方文档
配置:顶部[菜单栏、LOGO、关闭按钮等]所在的背景颜色及底部[状态等]所在背景颜色的配置,如下示例底部是白底透明、顶部是护眼的绿色:
{
    "other": "...",
    "workbench.colorCustomizations": {
        "editor.selectionBackground": "#f00",
        "[Quiet Light]": {
            "statusBar.background": "#ffffff00",
            "statusBar.foreground": "#616161",
            "titleBar.activeBackground": "#19CAAD",
            "titleBar.activeForeground": "#191919",
        },
    },
    "other": "..."
}
其他的主题、图标等网上很多样例,不再累述,这里贴一个我的截图和配置吧

{
    "workbench.startupEditor": "newUntitledFile",
    "workbench.colorTheme": "Quiet Light",
    "files.exclude": {
        "**/__pycache__": true,
        "**/.eggs": true,
        "**/*.egg-info": true,
        "**/*.pyc": true,
        "**/*.pyo": true
    },
    "workbench.tree.indent": 12,
    "git.enableCommitSigning": true,
    "git.path": "git.exe",
    "git.enabled": true,
    "python.pythonPath": "python.exe",
    "python.linting.flake8Enabled": true,
    "python.analysis.logLevel": "Warning",
    "python.globalModuleInstallation": true,
    "python.linting.pep8Enabled": true,
    "terminal.external.windowsExec": "C:\\Git\\git-bash.exe",
    "terminal.integrated.shell.windows": "C:\\WINDOWS\\System32\\wsl.exe",
    "explorer.confirmDelete": false,
    "files.encoding": "utf8",
    "files.eol": "\n",
    "sync.gist": "Setting Sync要求的github token for gist",
    "backgroundCover.enabled": true,
    "backgroundCover.imagePath": "C:/VSCodeBgImg/3.png",
    "backgroundCover.opacity": 0.5,
    "shellLauncher.shells.windows": [
        {
            "shell": "C:\\Windows\\System32\\cmd.exe",
            "label": "cmd"
        },
        {
            "shell": "C:\\Windows\\System32\\WindowsPowerShell\\v1.0\\powershell.exe",
            "label": "PowerShell"
        },
        {
            "shell": "C:\\Git\\bin\\bash.exe",
            "label": "Git bash"
        },
        {
            "shell": "C:\\Windows\\System32\\bash.exe",
            "label": "WSL Bash"
        }
    ],
    "breadcrumbs.enabled": false,
    "workbench.statusBar.feedback.visible": false,
    "workbench.tips.enabled": false,
    "extensions.closeExtensionDetailsOnViewChange": true,
    "window.zoomLevel": 0,
    "window.titleBarStyle": "custom",
    "bracketPairColorizer.forceUniqueOpeningColor": true,
    "editor.minimap.enabled": true,
    "editor.tabSize": 4,
    "editor.detectIndentation": false,
    "editor.insertSpaces": true,
    "editor.wordWrap": "on",
    "winopacity.opacity": 245,
    //设置用户选中代码段的颜色
    "workbench.colorCustomizations": {
        "editor.selectionBackground": "#f00",
        "[Quiet Light]": {
            "statusBar.background": "#ffffff00",
            "statusBar.foreground": "#616161",
            "titleBar.activeBackground": "#19CAAD",
            "titleBar.activeForeground": "#191919",
        },
    },
    "TortoiseSVN.tortoiseSVNProcExePath": "TortoiseProc.exe",
    "TortoiseSVN.autoCloseUpdateDialog": true,
    "workbench.activityBar.visible": false,
    "window.menuBarVisibility": "default",
    "[javascript]": {
        "editor.defaultFormatter": "HookyQR.beautify"
    },
    "[html]": {
        "editor.defaultFormatter": "HookyQR.beautify"
    },
    "[json]": {
        "editor.defaultFormatter": "HookyQR.beautify"
    },
    "rest-client.timeoutinmilliseconds": 5000,
    "workbench.iconTheme": "vscode-icons"
}
3. Sphinx+RST
之前写过一个制作接口文档的记录,https://blog.saintic.com/blog/263.html
不局限于接口文档,用sphinx写书也绰绰有余,基于rst并增加了许多功能,十分强大,官网是:http://www.sphinx-doc.org, 这里是一个中文翻译文档:https://zh-sphinx-doc.readthedocs.io
sphinx有很多主题可选,之后要托管的rtd有一款主题挺好,sphinx_rtd_theme,文档是:https://sphinx-rtd-theme.readthedocs.io
此外,我在使用这款主题时,增加了一些自定义配置,关于配置的详细文档是:http://www.sphinx-doc.org/en/master/usage/configuration.html#options-for-html-output
3.1 自定义css
通过sphinx-quickstart建立的文档项目配置文件是conf.py,自定义配置需要在这个文件中更改。
新增一行,比如:html_css_files = ['css/my.css'],姑且放到 html_static_path 这行后面,这个意思是引入css/my.css文件,这个文件放在html_static_path定义的目录下,一般是在 “文档项目/_static“ 下,新建css目录,创建my.css,例如:
@charset "utf-8";
.wy-nav-content {
    max-width: 100% !important;
}
.ethical-rtd.ethical-dark-theme {
    display:none;
}
示例的css用以将sphinx_rtd_theme主题的内容页右侧栏最大化、关闭左侧栏rtd显示的广告。
3.2 自定义js
类似于自定义css,配置项是html_js_files = ['js/my.js'],同样在html_static_path定义的目录下新建js目录和my.js文件,可以写你的js代码。
3.3 logo
配置项是html_logo,比如我的是:html_logo = '_static/images/logo.png',不晓得为什么还需要写_static,这个参数不是很了解,google得知的示例。
3.4 favicon
配置项是html_favicon,类似html_logo,比如html_favicon = '_static/images/favicon.png'
4. ReadTheDocs
同样可以参考之前的文章:https://blog.saintic.com/blog/263.html
额外提一点,关于自定义域名部分,文档是:https://docs.readthedocs.io/en/stable/custom_domains.html
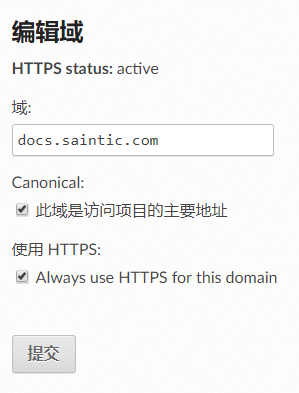
定位到项目-管理-域,可以添加你的域名,然后CNAME解析到.readthedocs.io,勾选上使用HTTPS后,无需其他操作,便可以支持安全访问,极其方便!
END
以上是个人使用记录,刚开始写RST不熟悉是很痛苦的,熟练后便能感觉到好处。
文章中示例仓库是:https://github.com/saintic/docs
示例文档地址是:https://docs.saintic.com